This smiley face piece is the inner gusset, cut out 2.
**Repeat!!
Leave a FOE tail, you can snip it later, it helps when you need something to pull the elastic through the machine.
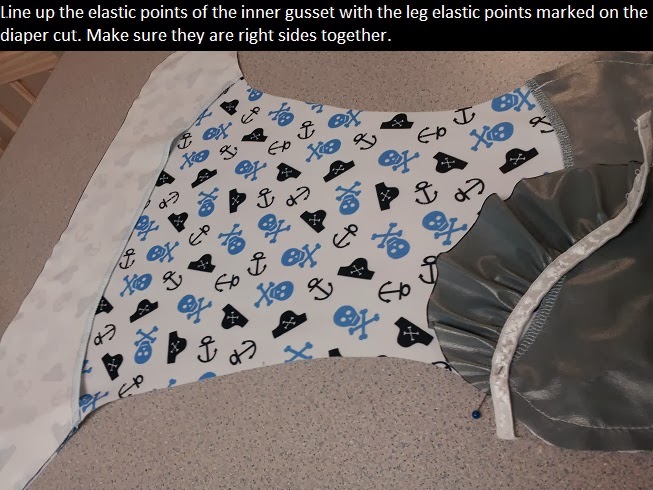
I have already sewn the "flaps" right sides to the diaper cut. Here I will sew the inner gussets to the diaper cut.
Excuse the wrinkly fingers! I do a lot of bare handed gardening :)
Here I use a Longer 3-Step Zig Zag so it won't take away the elasticity long term. Increase the length of the stitch.
I really hope this was detailed enough to follow. This is by far my favorite diaper covers in my son's rotation. They are a perfect fit! It is high enough in the front and back to completely cover flats, prefolds, and fitteds. My husband loves that he can use the flats to lay in prefolds so he doesn't have to try and Snappi a wiggly toddler. And best of all, they are mommy made :)


THIS TUTORIAL IS AWESOME THANKS!!
ReplyDeleteExcellent tutorial!
ReplyDeleteThis is perfect! I was intimidated to do double gusset covers before seeing this! Thank you, thank you!
ReplyDeleteGreat tutorial, let me know if you ever make a video! I also garden, it takes me forever to get the dirt from under my nails and cuticles...
ReplyDeleteThis tutorial was a life saver. I just paid $10 for a tutorial for Rocket Bottoms. It did not have this information, and that I purchased the item for the instructions. Your instructions and photos are so helpful. Love the fact that I can enlarge them on the web site to study them more closely. Wanted to make a variety of diaper covers and liked the idea of making one without FOE. Thanks again
ReplyDelete"My husband loves that he can use the flats to lay in prefolds"
ReplyDeleteDoes this mean you can just leave the prefold lose in this kind of cover? Sorry if it's a daft question, I'm just having trouble picturing what you mean (I'm not a native English speaker).
Great tutorial.